|
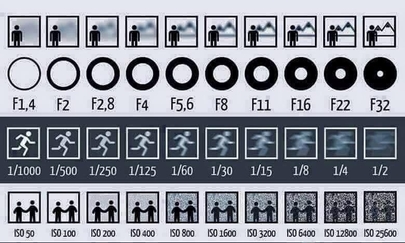
Most of the digital cameras are so advanced that makes people wonder why do they need a photographer when they can take nice photos by on their own. Hiring a photographer isn't just about carrying a heavy DSLR with expensive lens on it walking around taking photos. It is about getting creative images that stand out from the rest and using the correct camera setting for it. Sure enough, putting any camera in auto mode and you are ready to shoot for any events and even weddings. But does that make the person a photographer? We will talk about a few main points that a photographer sees before taking a photo.  Environment An experienced photographer will know the different kinds of lightings in any environment. Regardless of fluorescent or incandescent lightings, it will affect the image a lot. We call this white balance. What it does is to balance the color temperature and show “white” as white. It is a way of measuring the quality of the light source based on warmness or coolness measured in Kelvin. Which is why on most DSLRs you will see the white balance measured with a set of numbers followed by (K). A wrong white balance setting can cause a white object to look yellowish or bluish in the photos. Flash Not all photographers use flash nor all events require using flash. It all depends on the lighting conditions and the type of camera the photographer using at the point of time. Lighting will differ from venue to venue and events going on indoor and outdoor simultaneously. So photographers are geared to tackle these kinds of lighting issues at all times. Why we mentioned about the types of camera is because technology in photography is so advanced now that the camera can shoot in a dark condition even our human eyes can't see properly. Therefore, flash is subjective when using such good camera.  Aperture, Shutter and ISO Here comes a more complicated part of being a photographer. But once you understand the concept, you are able take control of your exposure and ditch auto mode for good. There is a lot of confusion going on when you first come in contact with exposure triangle, we will try to explain it as simple as possible. Let’s go… Aperture is to control your depth of field, the focus area, measured in f-stops. Usually you hear photographers saying F2.8, F4 etc. and even on the lens itself, this is to set the area that you want it to be in focus. The smaller the number the smaller the focus area is. For example, if you want to take a photo with just your subject in focus and background out of focus, you will likely to use F4 or lesser to achieve it. Or if you are taking a group photo of your family members, you will likely to use F8 or larger to make sure everyone in the photo is in focus. Shutter speed will depend on the movement or the activity of the subject you taking photograph, measured in 1/number to seconds. The numbers at the back represent the opening speed of the shutter of your camera. A slow shutter speed (e.g. 1/10) will cause your image to be blurred because the shutter opening is too long for sensor to capture a sharp photo. It is useful of you are taking a non-moving object or you want to capture a silky smooth waterfall. A fast shutter speed (e.g. 1/160) will stop the movement. For example, a sports event and you want to freeze a runner in action. You will need shutter speed of 1/1000 or faster. ISO is the sensitivity of the camera sensor and it varies from camera to camera on the performance. Some camera is able to perform up to ISO 25600 while some topped at ISO 12800. ISO will affect the noise in your images and the term noise technically means the amount of gains in the pictures. A higher ISO will make your camera sensor more sensitive to light and introduce more gain in the photo. Ideally, you would want your ISO settings to be as low as possible. On the right is an example of how aperture, shutter speed and ISO function. After knowing each function, we now put these 3 together to create an exposure for an image. Sometimes by looking at the camera settings without looking at the picture, you can tell how is the lighting condition on the actual environment. For example, in manual mode, we have settings like let’s say F8, 1/125 and ISO 6400. The lighting condition for these setting can be very dark and maybe the photographer is trying to take a group photo. Usually in any scenarios, the photographers get to decide which two settings are more important compared to another. For example, we want our image to be out of focus and less grainy image. We will need the setting to be somewhere F2.8, ISO 100 and let the shutter speed compensate for the overall exposure.
These are the brief fundamentals on the exposure triangle. Knowing which area is more important compared to another and let the third exposure element to compensate the rest. Let us know if you have any questions with regards to this week’s topic by contacting us here.
1 Comment
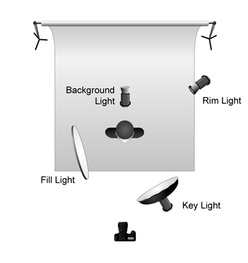
 Picking the right image for your portrait session can be a long and tedious process. Therefore, we will discuss how we assist our client to shortlist their images and choose their final photos easier. Some of you might have experience with studio photo shoot, but still having difficulties in choosing the right photos for your applications. Before every start of any studio portrait session, we will discuss on your objectives for taking the photos. For some people, they want to print it out and hang it on their wall. There are some who just want capture their portrait for memories sake and keep it for years to come. For whatever reasons, there has to be a purpose for taking a portrait shoot. Before taking up any personal portrait, have an idea in mind on what are you going to do with the pictures and let the photographer know about it. This will not only helps the photographer in the conceptualization process during the creative discussion, it will also allows the photographer to gives you some general ideas as suggestions for you to take on. It is best if you are able to collect some reference images online to show the photographer so he/she can use it as reference for a start. This process is important because you do not want to regret when you hang the images you choose does not suit your room.  Next is who is in the portrait session, portrait does not mean for individuals only. It can be any numbers from 1 to as many as the whole company. Perhaps for individual, it is easier to communicate and arrange the session. But as the number of pax grow, the difficulties increases. Therefore, take note on the attendance if your intended session is going to be a big group. Many will have trouble on what to wear for portrait session. Without doubt it will always be a problem for anyone. We will always suggest a plain top and pair of jeans if it is a group portrait. Not only it provides a sense of unity, it will also look more pleasant for a longer period because photos are meant to keep for years but fashion may not last. As for individual portrait, we will keep the options open as long as the final images are aligned with your objectives. Usually personal portraits are taken every 2-3 years, but family portraits should be taken yearly. Exactly how is this relevant to picking the right images, you may ask. Well, most of the application needs your recent headshot from the past 6 months (e.g. articles, passport photo and job applications). Getting your portrait done every 2-3 years is as important as your career advancement. It represents yourself without you physically being there and picking the right image will follow through your success. Bring along your past portrait to show your photographer, gives them some areas of improvement with feedbacks received from your last portrait session. This process ensures you get the right image you wanted without getting repeated images for your next session. As we are shooting all studio sessions in tethered mode, this means you get to see the images taken on the spot throughout the session. We will explore possibilities along the way and make changes when necessary. In a studio lighting setup, the whole environmental mood changes. Some of you may get very nervous while some may not have the confident to bring out the best of you. While just saying “don’t be nervous” doesn’t really helps, we will show you the image taken on a larger screen to boost your confident and let you know for example which side of your face look better etc. This type of confident is build from inside out and we believe that once you have the confidence in you, it is very hard not to take nice portraits. With these, we will end this week’s update. Let us know which area you interested to know or any technical questions by contacting us here. When we prepare for a shoot, there are countless discussions and meetings with our client before the actual shoot. We will first understand the objective(s) of our client’s needs before we get too technical on the equipment. After a few creative discussions, we will get a few reference images to show our client to make sure the final outputs are what they are looking for. We will be using our studio portraiture session for this example, as we are handling portraiture projects frequently. Below are a few key areas we look out for in most of the portrait sessions.  Getting Tethered This means connecting the camera to the computer directly. What this does is to provide a better definition of the photos taken and allows the photographer to check on the focus critically on the monitor screen. It enables the photographer to correct any issues of the settings on the spot quicker compared to a small screen on the back of the camera. Another good thing about getting tethered is we allow our model to see the images of them taken and correct their poses easily.  Gear Let’s not talk about brands but rather what gets the job done correctly and effectively. In most cases, we are using a full frame camera body paired with 24 – 70mm because the image it can produced allows our client to print 24 x 36” with no issues and the flexible focal length gives our photographer to take a tight headshot to a full body image. Studio lightings are pretty standard in the industry and it can vary from a single light to a dozens of lights settings. Ultimately, it depends of the type of project we are handling. For portraiture, we use mostly 3 monolights (one key light, one rim light and the other for background). For fill light, we usually use a 5 in 1 reflector to fill the shadow if necessary. What it does is to fill in some lights the shadow for our subject and gives it a more 3 dimensional look to the image. Note that studio setup can vary from session to session depending on client's requirements. Makeup Artist
We offer optional makeup artist for our portrait shoot to give the image a professional touch by enhancing our model’s facial complexion. A professionally trained makeup artist understand different types of facial structures and know how to draw attention away from the flaw but focus on the positive features. Our DI artist will improve the image further by correcting the exposure, removal of fine blemishes, color toning, facial and body contouring before the final images are handed to our client. There are also other factors involved in a portrait session and we will discuss it in details next time. If you have any enquiries on personal portrait, please do not hesitate to contact us.
As this the first post of our blog, we shall declare that we are not professional copywriter but a group of creative individuals. Therefore, I will foresee many broken English (Singlish) along the way in the future so please be lenient with us on our grammar and vocabulary on blog posts. We will try our very best to update our blog post once a week on our projects and some behind the scenes (maybe).
For a start, let us introduce a new type of image called Cinemagraph (example below). It isn't exactly new in the creative field, it was first created by Jamie Beck & Kevin Burg back in 2009. Cinemagraph is an animated GIF image that brings basically any images to life. It contains the essences of a video and the spirit of a photo that makes cinemagraph different from conventional video or photo presentations. In addition, the animation is endless! Which means, the image will be animated consistently non-stop! Currently we don't see many of them in the social media, partly because some of the programming aspects does not support GIF format. So it is uncommon for most users to get in contact with cinemagraph. As we are still exploring more creative ideas and techniques on cinemagraphs, we will show you guys along the way. That's all for this week. See ya.
As this the first post of our blog, we shall declare that we are not professional copywriter but a group of creative individuals. Therefore, I will foresee many broken English (Singlish) along the way in the future so please be lenient with us on our grammar and vocabulary on blog posts. We will try our very best to update our blog post once a week on our projects and some behind the scenes (maybe).
For a start, let us introduce a new type of image called Cinemagraph (example below). It isn't exactly new in the creative field, it was first created by Jamie Beck & Kevin Burg back in 2009. Cinemagraph is an animated GIF image that brings basically any images to life. It contains the essences of a video and the spirit of a photo that makes cinemagraph different from conventional video or photo presentations. In addition, the animation is endless! Which means, the image will be animated consistently non-stop! Currently we don't see many of them in the social media, partly because some of the programming aspects does not support GIF format. So it is uncommon for most users to get in contact with cinemagraph. As we are still exploring more creative ideas and techniques on cinemagraphs, we will show you guys along the way. That's all for this week. See ya. |
HAZE MAZE
|
